Basically I spent my entire Friday baking for a halloween wedding. Don’t get ahead of yourself… I was NOT paid – so no sending in pictures to cakewrecks! And I didn’t even make the cake, thank goodness!
Anyway, I mentioned last week this was coming. Last Tuesday, I sent Steve off to work with a few extra pumpkin cake pops to give away to his co-workers. No big deal. But much to my surprise I get a message from him around lunch asking if I can make 50 pumpkins for Friday. I text back: “Okay… wait, what?… Why?… For who?… I guess so.” I basically said/asked all of these before Steve even had a chance to respond to the first. I did not know what I was getting myself into…
Let’s just say cake pops are not the quickest baking project I’ve done. They aren’t necessarily hard, just super time consuming. Bakerella makes it look so easy! I ended up making about 50 chocolate/bailey’s cream cheese pumpkin pops and about 50 red velvet/cream cheese spiders and regular cake pops. I also made just under 100 mini black bottom cupcakes with RED centers! But in the time it took me to make and package all those cake pops, I could have made well over a thousand cupcakes.
Now to the cake pops…
For the pumpkins you’ll need: Chocolate cake (from box), Bailey’s liquor ( 2-3 Tbsp), cream cheese frosting, orange candy melts, marzipan, and candy sticks
For the spiders/plain you’ll need: Red velvet cake, cream cheese frosting, chocolate melts, licorice wheels, raspberry candies, chocolate sprinkles, and candy sticks
Bake and cool the chocolate and red velvet cakes. Simple enough. After the cakes are cool, process cakes into crumbs (separately) in a food processor. I found it easier to get consistent crumbs this way instead of by hand since the edges of the cake can be slightly drier than the middle.

To the chocolate cake crumbs add some Bailey’s – yum! I didn’t measure, but it was a few tablespoons. Maybe 2 or 3 – it all depends on how much you like the taste of Bailey’s. To this, add about a half a container of cream cheese frosting. I decided to use store bought frosting just to make sure that consistency was right because I was already using the Bailey’s. Add frosting until the cake mixture can just be easily formed into balls and hold their shape.
To the red velvet cake crumbs add a little more cream cheese frosting than was added to the chocolate cake, in order to compensate for the lack of Bailey’s. Again, add frosting until the cake can be formed into sturdy balls.
Then… surprise, surprise… form into balls! About the size of a quarter. I used a cookie scoop to make sure they all turned out the same size. I lined up the balls on a parchment-lined baking sheet. Melt the orange candy melts (I used the double-boiler method), dip in the end of a candy stick and push one into each chocolate ball. Use the chocolate melts for dipping the sticks inserted into the red velvet balls. Chill a couple of hours.

While these were cooling take out some marzipan, tint it green, and roll it out to start making the leaves. I used a small leaf cutter and the formed the leaves by pinching on end slightly and pulling back on the other. If they had been white, my leaves would have almost look like calla lillies! For the stems knead some Tootsie rolls, form into ropes and cut little stems. Let me warn you – Tootsie rolls are hard!! My hands were sore after making all the stems. I think if I did these again I would go back to the marzipan stems. When you have all the accessories ready and the balls have sufficiently cooled, its dipping time.
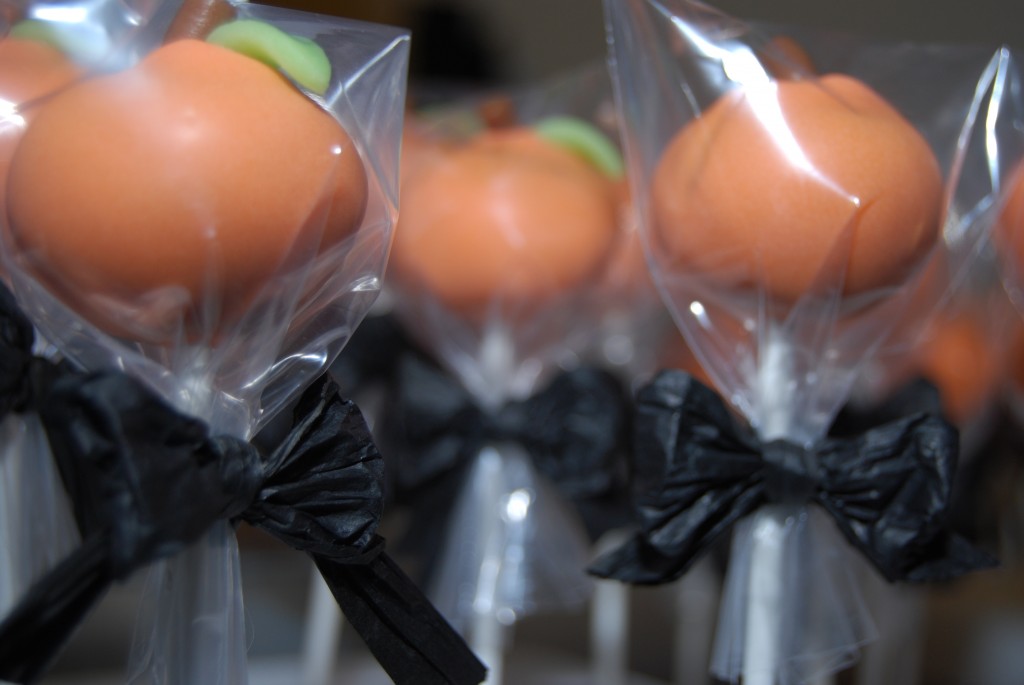
First for the pumpkins: Let me warn you – I had some problems with the candy coating cracking on a few pumpkins because they were too cold. So watch out! I won’t go into too much detail on dipping – I just put the ball in on an angle and used a spatula to gently push the candy coating up along bottom until it was covered and continued by rotating the ball slowly. When I made it all the way around I pulled it up, twisting gently to take off some of the excess. Put the dipped cake pop upright in a block of styrofoam. Before the candy coating hardens place a stem and leaf on each pumpkin. Let harden. Pumpkin cake pops – done!

For the red velvet balls, dip into the chocolate melts and immediate sprinkle with chocolate sprinkles. These I did NOT insert into styrofoam but instead placed back, ball side down on parchment-lined baking sheets.
Decorate the spiders when they are completely dry. Basically the legs are made out of the licorice wheels, unraveled and split and the eyes are the raspberry candies. Everything is attached with melted chocolate. Steve was home by the time I got to this part so he helped with these. We had a good time – we just kept laughing at how utterly ridiculous the the spiders were turning out. Just look at these goofy things!

And because I just couldn’t resist – I made an upside-down spider, a.k.a. dead and impaled-on-a-stick spider. Well, maybe I made more than one… but I thought they were cute.

But the spiders were just taking way too long to decorate. We gave up at around 15. Then it was packaging time. I bagged each pumpkin pop and plain red velvet pops in an individual bag and tied with a raffia bow. I thought they turned out pretty cute in the end.

Steve and I spent a good hour trying to figure out the best way to display and transport these pops. We had bought a basket and some styrofoam inserts so we started shoving and arranging all the cake pops in there…. only to realize we had way too many pops to fit in the basket. So we decided the pumpkins had to have their own container so the spiders could creepily roam the basket. So…. what to do? Finally I got one of my red glass bowls down from the top shelf, washed it (it doesn’t see much use…) and filled it with some Halloween candy. Perfect for a beautiful bouquet of pumpkins…. never thought I’d be saying that one.
Anyway, here is the final product. Spiders and other red velvet pops, in their basket and ready to go.


And here’s my bouquet of pumpkin pops 


I’ll end with a photo of my black bottom cupcakes with red filling. The photos aren’t great and they didn’t really capture how red they were (rather than orange). They are so cute, I might make some red and green ones for Christmas, or maybe more red ones for Valentine’s day! Next time I’ll post and we can play “guess that shape” with the filling on the top of the cupcakes. Steve and I found some hearts, a ghost, a bat, a boot… the list goes on and on. Clouds are so boring in comparison to black bottom cupcakes


Oh my. Let me tell you – these were such a hit at the Hallo-wedding!! EVERYONE loved them – I actually had to hide some so I could get some for me! Oh yeah – this is the bride of the wedding!
Steve is a great co-worker who came waltzing in with the most fabulous pumpkin shaped cake lollipops one day! and I thought BINGO – for the wedding! Asked him if his fiance, Dana, could whip up a batch (sorry Dana – I had no idea they were so time consuming!) But they were the hit of the party! I think there were more pictures of these lollipops than me – hehehe!
These are a great favor item – I put them in the favor boxes for my wedding and people still comment how much they enjoyed these treats. Along with everything else Dana and Steve made. Truthfully, without these, my table scape would haveben quite drab. Many huge thanks to Steve and Dana!
These are absolutely gorgeous cake pops! Very cool!
Also, you have a real talent with professional, pretty packaging.